Player & Target Commands
You need to know that by default all commands are run by the console, so if you want that the player run the command add SUDO or SUDO_OP before.
(Click on SUDO or SUDO_OP for more infos)
Don't use this option for vanilla commands and CUSTOM COMMANDS, to use vanilla commands properly go to FAQ and "How to use vanilla commands",
"Multi-world" compatibility for the vanilla commands.
execute in <<NAMEOFYOUR_WORLD>> run ...
Example, you want summon a Zombie in the world SsomarWorld:
execute in <<SsomarWorld>> run summon zombie 100 50 100
Example with a placeholder:
execute in <<%player_world%>> run summon zombie 100 50 100
You want keep the brut HEX form in your command ? add the tag BRUT_HEX in your command. It works anywhere in the command line but it's recommended to put it in the first part of the cmd to make it less confusing
By default all commands aren't executed if the player is offline. (the commands will be executed at the connection of the player)
But you can add the tag [<OFFLINE>] in your commands to remove this restriction.
(Very useful for broadcast, boost, giveall commands, ...)
Example:
- [<OFFLINE>] broadcast hello !
- [<OFFLINE>] execute at %player% run setblock %block_x_int%+3 %block_y_int%-1 %block_z_int%-14 minecraft:air
You can use [<CLEAR_IF_DISCONNECT>] if you want to clear commands if the player disconnects
Example:
- [<CLEAR_IF_DISCONNECT>] say meow
Mixed Commands
In addition of the following list of commands you can also use:
These commands can be used in the Player related commands OR Entity related commands.
Custom commands
Sorted by alphabetical order
ABSORPTION
- Info: Gives absorption effect to the player
- Command settings:
{amount}: amount of absorption half hearts. Supports negative values to remove.{time}: time of the effect in ticks. Set it empty or "0" if want to be infinite.
- Example:
activators:
  activator0: # Activator ID, you can create as many activator on the activators list
    option: # Here goes an activator that is at least instance of player
    playerCommands:
    - ABSORPTION amount:5 time:200 # Gives the player absorption
  activator1: # Activator ID, you can create as many activator on the activators list
    option: # Here goes an activator that is at least instance of target
    targetCommands:
    - ABSORPTION amount:5 time:200 # Gives the target absorption
Your MAX_ABSORPTION attribute value must be above 0 !
Check the value by typing : /attribute PLAYER_NAME minecraft:max_absorption base get
And you can increase it by typing: /attribute PLAYER_NAME minecraft:max_absorption base set 20
activators:
  activator0: # Activator ID, you can create as many activator on the activators list
    option: # Here goes an activator that is at least instance of player
    playerCommands:
    # You can do that to temporary up the max_absorption value of the player
    - minecraft:attribute %player% minecraft:max_absorption base set 5**
    - ABSORPTION amount:5 time:200
    - DELAY_TICK 200
    - minecraft:attribute PLAYER_NAME minecraft:max_absorption base set 0
  activator1: # Activator ID, you can create as many activator on the activators list
    option: # Here goes an activator that is at least instance of target
    targetCommands:
    # You can do that to temporary up the max_absorption value of the target
    - minecraft:attribute %player% minecraft:max_absorption base set 5
    - ABSORPTION amount:5 time:200
    - DELAY_TICK 200
    - minecraft:attribute PLAYER_NAME minecraft:max_absorption base set 0
ACTIONBAR
- Info: Display the action bar with your text + the time remaining (59, 58, 57...).
- Command settings:
{text}: Your text to display{delay}: Duration in seconds
- Example:
activators:
  activator0: # Activator ID, you can create as many activator on the activators list
    option: # Here goes an activator that is at least instance of player
    playerCommands:
    - `ACTIONBAR &6Hey &e%player% ! 10` # Sends an ACTIONBAR to the player
  activator1: # Activator ID, you can create as many activator on the activators list
    option: # Here goes an activator that is at least instance of target
    targetCommands:
    - `ACTIONBAR &6Hey &e%player% ! 10`# Sends an ACTIONBAR to the target
ADD_ITEM_ATTRIBUTE
- Info: It adds an attribute to an item as sum or rest operation.
- Command settings:
{slot}: The slot where it will be applied. -1 for mainhand{attribute}: The attribute you want to add. Attributes list{value}: The value for the operation{equipmentSlot}: The slot where the attribute will be enabled. EquipmentSlot list{mode}: select the mode of addition- mode:ADD # Add the attribute to the item
- mode:OVERRIDE # Remove the current attributes of the same type of the item + Add the attribute to the item
- mode:STACK # Stack with the attribute present on the item, if no one exist it adds it
- affectDefaultAttributes: true or false # When it's true the mode OVERRIDE will also override the default attributes, and for the MODE stack it allows to stack with the default attributes (green)
- Example:
activators:
  activator0: # Activator ID, you can create as many activator on the activators list
    option: # Here goes an activator that is at least instance of player
    playerCommands:
    - ADD_ITEM_ATTRIBUTE slot:%slot% attribute:GENERIC_ATTACK_DAMAGE value:1.0 equipmentSlot:HAND mode:ADD # Add this attribute to the player
  activator1: # Activator ID, you can create as many activator on the activators list
    option: # Here goes an activator that is at least instance of target
    targetCommands:
    - ADD_ITEM_ATTRIBUTE slot:%slot% attribute:GENERIC_ATTACK_DAMAGE value:1.0 equipmentSlot:HAND mode:STACK affectDefaultAttributes: true # Add this attribute to the target
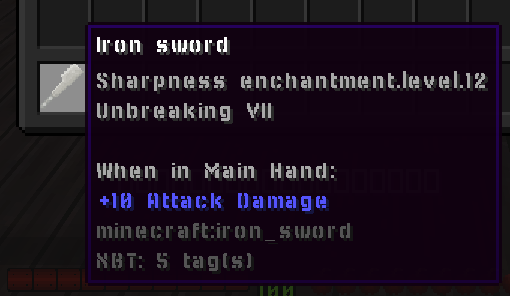
ADD_ITEM_ENCHANTMENT
- Info: It adds an enchantment on an item on a specific slot with certain level
- Command settings:
{slot}: The slot where it will be applied. -1 for mainhand{enchantment}: The enchantment that you want to be applied, don't use spaces, use the minecraft enchantments not the display ones. Enchantments{level}: The level for the enchantment
- Example:
activators:
  activator0: # Activator ID, you can create as many activator on the activators list
    option: # Here goes an activator that is at least instance of player
    playerCommands:
    - ADD_ITEM_ENCHANTMENT slot:-1 enchantment:unbreaking level:1
  activator1: # Activator ID, you can create as many activator on the activators list
    option: # Here goes an activator that is at least instance of target
    targetCommands:
    - ADD_ITEM_ENCHANTMENT slot:-1 enchantment:unbreaking level:1
ADD_ITEM_LORE
- Info: Adds a line of lore
- Command settings:
{slot}: The slot where it will be applied. -1 for mainhand{text}: The text for the new lore line
- Example:
activators:
  activator0: # Activator ID, you can create as many activator on the activators list
    option: # Here goes an activator that is at least instance of player
    playerCommands:
    - ADD_ITEM_LORE slot:%slot% text:&7Item of %player%
  activator1: # Activator ID, you can create as many activator on the activators list
    option: # Here goes an activator that is at least instance of target
    playerCommands:
    - ADD_ITEM_LORE slot:%slot% text:&7Item of %target% added by %player%
BOOTS
- Info: Puts the item in your main hand to your boots slot. (Will not work if the item has "Curse of Binding")
- No command setting
- Example:
activators:
  activator0: # Activator ID, you can create as many activator on the activators list
    option: # Here goes an activator that is at least instance of player
    playerCommands:
    - BOOTS
BOSSBAR
- Info: Creates a bossbar text for a certain duration time.
- Command settings:
{time}: The duration of the bossbar in ticks{color}: Color of bossbar text{text}: text on the bossbar (Use underscores "_" to add whitespace to your argument.){count}: how many times you want it to count- if this option is present, the time argument will not matter anymore
{countTicks}: true/false whether you want it to count in ticks or in seconds instead{countOrder}:- ascending: makes the timer count from 0
- descending: makes the timer count from the given
{overrideMode}:- NO_OVERRIDE: It doesn't override the other Bossbars
- OVERRIDE_ALL: It will override all other BossBars sent by SCore
- OVERRIDE_SAME_TEXT: It will override the other Bossbars sent by SCore that contain the same text
{barProgress}: (default = 1.0) The initial progress of the bar (0.0 to 1.0). Works with both static and countdown bars (only descending countdown)
- Example:
activators:
  activator0: # Activator ID, you can create as many activator on the activators list
    option: # Here goes an activator that is at least instance of player
    playerCommands:
    - BOSSBAR time:200 color:RED text:This_is_a_bossbar text
    - BOSSBAR time:20 color:BLUE text:Hello_world count:50 countTicks:true countOrder:ascending
    - BOSSBAR time:200 color:RED text:This is a bossbar text overrideMode:OVERRIDE_SAME_TEXT
    - BOSSBAR time:200 color:GREEN text:Half filled bar barProgress:0.5
CANCEL_PICKUP
- Info: Disables pickup on a player for a set amount of time
- Command settings:
{time}: The duration in ticks of how long till the player can pickup items again{material}: If set the player cant pickup only the material specified, if null he can't pickup everything
- Example:
activators:
  activator0: # Activator ID, you can create as many activator on the activators list
    option: # Here goes an activator that is at least instance of player
    playerCommands:
    - CANCEL_PICKUP time:600
    - CANCEL_PICKUP time:600 material:stone
The only way to RESET this command after setting a time in ticks is reloading or restarting the server. If would like a way to reset this suggest it in the #suggestions channel on Discord.
CHAT
- Info: Send a message from the player to the chat
- Command settings:
{text}: Text to send
- Example:
activators:
  activator0: # Activator ID, you can create as many activator on the activators list
    option: # Here goes an activator that is at least instance of player
    playerCommands:
    - CHAT &6Hello !!
CHESTPLATE
- Info: Puts the item in your main hand to your chestplate slot. (Will not work if the item has "Curse of Binding")
- No command setting
- Example:
activators:
  activator0: # Activator ID, you can create as many activator on the activators list
    option: # Here goes an activator that is at least instance of player
    playerCommands:
    - CHESTPLATE
CLOSE_INVENTORY
- Info: It closes the inventory to the player
- No command setting
- Example:
activators:
  activator0: # Activator ID, you can create as many activator on the activators list
    option: # Here goes an activator that is at least instance of player
    playerCommands:
    - CLOSE_INVENTORY
CROPS_GROWTH_BOOST
- Info: It boost the growth of the crops around you
- Command settings:
{radius}: The radius of the boost (Default 5){delay}: The delay in ticks between each growth boost{duration}: The duration in ticks of the total boost{chance}: The chance of growth the blocks have when the boost is applied
- Example:
The following command will generate 20 growth boost every 10 ticks.
All blocks within the radius will have 50% chance to growth when a boost is applied.
activators:
  activator0: # Activator ID, you can create as many activator on the activators list
    option: # Here goes an activator that is at least instance of player
    playerCommands:
    - CROPS_GROWTH_BOOST radius:5 delay:10 durations:200 chance:50
DISABLE_FLY_ACTIVATION
- Info: Deny the usage of the fly for a player (Gliding in Elytra is not considered as flying)
- Command setting:
{time}: The duration in seconds of the effect
- Example: (The command below disable the activation of the fly during 1 minute)
activators:
  activator0: # Activator ID, you can create as many activator on the activators list
    option: # Here goes an activator that is at least instance of player
    playerCommands:
    - DISABLE_FLY_ACTIVATION time:60
DISABLE_GLIDE_ACTIVATION
- Info: Deny the use of elytra for a period of time
- Command settings:
{time}: The duration in seconds of the effect
- Example: (the command below disable the use of elytra for 20 secs)
activators:
  activator0: # Activator ID, you can create as many activator on the activators list
    option: # Here goes an activator that is at least instance of player
    playerCommands:
    - DISABLE_GLIDE_ACTIVATION time:20
EICOOLDOWN
- Info: It applys a cooldown to a specific ExecutableItems
- Command settings:
{PLAYER}: The player to target the command{ID}: The id of the ExecutableItem or "all" for all ExecutableItems{DURATION}: The amount of time{boolean TICKS}: (Default: false) If false, the duration arg value will be seen as in seconds. If true, it will be seen as in ticks.[optional activator id]: (Optional) You can apply it to a specific activator id
- Example:
activators:
  activator0: # Activator ID, you can create as many activator on the activators list
    option: # Here goes an activator that is at least instance of player
    playerCommands:
    - EICOOLDOWN %player% thisismyid 10 true # For the ExecutableItem thisismyid
    - EICOOLDOWN %player% all 10 true # For all ExecutableItems
EBCOOLDOWN
- Info: It applys a cooldown to a specific ExecutableBlocks
- Command settings:
{PLAYER}: The player to target the command{ID}: The id of the ExecutableBlocks or "all" for all ExecutableBlocks{DURATION}: The amount of time{boolean TICKS}: (Default: false) If false, the duration arg value will be seen as in seconds. If true, it will be seen as in ticks.[optional activator id]: (Optional) You can apply it to a specific activator id
- Example:
activators:**
  activator0: # Activator ID, you can create as many activator on the activators list
    option: # Here goes an activator that is at least instance of player
    playerCommands:
    - EBCOOLDOWN %player% thisismyid 10 true # For the ExecutableBlock thisismyid
    - EBCOOLDOWN %player% all 10 true # For all ExecutableBlocks
EECOOLDOWN
- Info: It applys a cooldown to a specific ExecutableItems
- Command settings:
{PLAYER}: The player to target the command{ID}: The id of the ExecutableEvent or "all" for all ExecutableEvents{DURATION}: The amount of time{boolean TICKS}: (Default: false) If false, the duration arg value will be seen as in seconds. If true, it will be seen as in ticks.[optional activator id]: (Optional) You can apply it to a specific activator id
- Example:
activators:
  activator0: # Activator ID, you can create as many activator on the activators list
    option: # Here goes an activator that is at least instance of player
    playerCommands:
    - EECOOLDOWN %player% thisismyid 10 true # For the ExecutableEvent thisismyid
    - EECOOLDOWN %player% all 10 true # For all ExecutableEvents
FIREWORK_BOOST
- Info: If this command is executed while the caster is gliding using the elytra, it will spawn a firework rocket in a way similar to how when players right-click a firework in their hand while gliding to gain distance.
- Command settings:
{duration}: The firework's lifetime in seconds
- Example:
activators:
  activator0: # Activator ID, you can create as many activator on the activators list
    option: # Here goes an activator that is at least instance of player
    playerCommands:
    - FIREWORK_BOOST 20
FLY OFF
- Info: Disables creative flight on the player and if the player's flight get's disabled midair, the player will be teleported on the possible block under the player.
- Command setting:
[teleportOnTheGround]: (Optional) (default = true) Whether the player would get teleported to the ground or not
- Example:
activators:
  activator0: # Activator ID, you can create as many activator on the activators list
    option: # Here goes an activator that is at least instance of player
    playerCommands:
    - FLY_OFF teleportOnTheGround:true
FLY_ON
- Info: Gives the player creative flight
- No command setting
- Example:
activators:
  activator0: # Activator ID, you can create as many activator on the activators list
    option: # Here goes an activator that is at least instance of player
    playerCommands:
    - FLY_ON
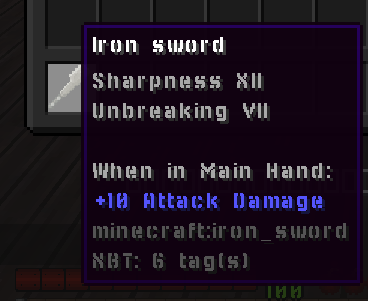
FORMAT_ENCHANTMENTS
- Info: It formats all enchantments in your lore
- Command settings:
{slot}: The slot to target (-1 for mainhand)
- Example:
activators:
  activator0: # Activator ID, you can create as many activator on the activators list
    option: # Here goes an activator that is at least instance of player
    playerCommands:
    - FORMAT_ENCHANTMENTS %slot%
 ->
-> 
GIVE_MONEY
- Info: Give money to a player
- It requires Vault plugin
- Command settings:
- amount: the amount to give
- Example:
activators:
  activator0: # Activator ID, you can create as many activator on the activators list
    option: # Here goes an activator that is at least instance of player
    playerCommands:
    - GIVE_MONEY amount:50.0
GRAVITY_DISABLE
- Info: It stops the gravity for the player, stopping the player to "fall" down or going up.
- No command settings
- Example:
activators:
  activator0: # Activator ID, you can create as many activator on the activators list
    option: # Here goes an activator that is at least instance of player
    playerCommands:
    - GRAVITY_DISABLE
    - DELAY 5
    - GRAVITY_ENABLE
GRAVITY_ENABLE
- Info: It enable again the gravity for the player, so the player will fall normally.
- No command setting
- Example:
activators:
  activator0: # Activator ID, you can create as many activator on the activators list
    option: # Here goes an activator that is at least instance of player
    playerCommands:
    - GRAVITY_DISABLE
    - DELAY 5
    - GRAVITY_ENABLE
HEAD
- Info: Puts the item in your main hand to your head slot. (Will not work if the item has "Curse of Binding")
- No command setting
- Example:
activators:
  activator0: # Activator ID, you can create as many activator on the activators list
    option: # Here goes an activator that is at least instance of player
    playerCommands:
    - HEAD
JOBS_MONEY_BOOST
- Info: Increases the money gained temporarily. For Jobs reborn
- Command settings:
{multiplier}: Multiplier value{time}: Duration in seconds of the boost in seconds
- Example:
activators:
  activator0: # Activator ID, you can create as many activator on the activators list
    option: # Here goes an activator that is at least instance of player
    playerCommands:
    - JOBS_MONEY_BOOST multiplier:2.0 time:10
Multiplier doesn't affect the actionbar values from Jobs. The multiplier from this command only applies once the Jobs plugin decides to increment obtained money, xp and points.
If executed multiple times with enough duration on each boost, all ongoing boosts can stack.
JOBS_XP_BOOST
- Info: Multiplies Jobs plugin XP gains temporarily. For Jobs reborn
- Command settings:
{multiplier}: XP multiplier value (e.g., 2.0 for double XP){time}: Duration in seconds before the boost expires
- Example:
activators:
  activator0: # Activator ID, you can create as many activator on the activators list
    option: # Here goes an activator that is at least instance of player
    playerCommands:
    - JOBS_XP_BOOST multiplier:2.0 time:10
Multiplier doesn't affect the actionbar values from Jobs. The multiplier from this command only applies once the Jobs plugin decides to increment obtained money, xp and points.
If executed multiple times with enough duration on each boost, all ongoing boosts can stack.
This command supports stacking multiple boosts multiplicatively.
LAUNCH
- Info: Launches a custom projectile. Reference
- List:
Projectile Types
- ARROW
- DRAGONFIREBALL
- EGG
- ENDERPEARL
- FIREBALL
- LARGEFIREBALL
- LINGENRINGPOTION
- LLAMASPIT
- SHULKERBULLET (Only available for 1.12+)
- SIZEDFIREBALL
- SNOWBALL
- TRIDENT
- WITHERSKULL
- Command settings:
{projectile}: the type of the projectile or the custom projectile ID from SCore ( Reference )[angleRotationVertical]: (Optional) (default = 0) Only for version 1.14+ (in degrees) Define the direction where the entity will be launched
[angleRotationHorizontal]: (Optional) (default = 0)Only for version 1.14+ (in degrees) Define the direction where the entity will be launched[velocity]: (Optional) (default = 1) To customize the velocity of the projectile
- Example:
activators:
  activator0: # Activator ID, you can create as many activator on the activators list
    option: # Here goes an activator that is at least instance of player
    playerCommands:
    - LAUNCH projectile:My_Custom_Proj velocity:5
- Example multiple shoots:
activators:
  activator0: # Activator ID, you can create as many activator on the activators list
    option: # Here goes an activator that is at least instance of player
    playerCommands:
    - LAUNCH projectile:WITHERSKULL
    - LAUNCH projectile:WITHERSKULL angleRotationVertical:20
    - LAUNCH projectile:WITHERSKULL angleRotationVertical:-20
If you use the LAUNCH COMMAND in the activator PLAYER_LAUNCH_PROJECTILE, and the projectile has been launched by a bow, the projectile launch with the custom LAUNCH command will keep the same velocity.
If you use SHULKERBULLET as the projectile type, it will pick the caster's cursor as its target. Otherwise, it will target the nearest entity from the caster.
Current Issues:
- Shulker Bullets cannot be used in 1.9.4, 1.10.2, 1.11.2. 1.12 onwards should have no complications aside from having to create a SCore projectile to give a Shulker Bullet proper flight velocity.
LEGGINGS
- Info: Puts the item in your main hand to your leggings slot. (Will not work if the item has "Curse of Binding")
- No command setting
- Example:
activators:
  activator0: # Activator ID, you can create as many activator on the activators list
    option: # Here goes an activator that is at least instance of player
    playerCommands:
    - LEGGINGS
LOCATED_LAUNCH
- Info: Launches a projectile at a specific location
- Command settings:
{projectileType}: the type of the projectile or the custom projectile ID from SCore ( Reference )[frontValue]: (Optional) (default = 0) positive=front , negative=back - Front/Back Position. For example, if you want to spawn the projectile 5 blocks far from where you're facing, use a higher positive value[rightValue]: (Optional) (default = 0) right=positive, negative=left - Right/Left Position. For example, if you want the projectile to spawn to your left, use a higher negative value[yValue]: (Optional) (default = 0) To how high up from your Y position will the projectile will spawn.[velocity]: (Optional) (default = 1) To how fast will the projectile fly. Set the value to 0 for the projectile to fall downwards upon spawning the projectile.[angleRotationVertical]: (Optional) (default = 0)Only for version 1.14+ you can add a vetical rotation for your projectile (in degrees)[angleRotationHorizontal]: (Optional) (default = 0)Only for version 1.14+ you can add a horizontal rotation for your projectile (in degrees)
- Example:
activators:
  activator0: # Activator ID, you can create as many activator on the activators list
    option: # Here goes an activator that is at least instance of player
    playerCommands:
    - LOCATED_LAUNCH projectile:ARROW frontValue:0 rightValue:0 yValue:0 velocity:1 angleRotationVertical:0 angleRotationHorizontal:0
MINECART_BOOST
- Info: It boost you when riding a minecart (Effect close to when you go up of a powered rail)
- Command setting:
{boost}: The boost speed
- Example:
activators:
  activator0: # Activator ID, you can create as many activator on the activators list
    option: # Here goes an activator that is at least instance of player
    playerCommands:
    - MINECART_BOOST boost:10
MIX_HOTBAR
- Info: it mixes the hotbar of the player
- No command setting
- Example:
activators:
  activator0: # Activator ID, you can create as many activator on the activators list
    option: # Here goes an activator that is at least instance of player
    playerCommands:
    - MIX_HOTBAR
MODIFY_DURABILITY
- Modifies the durability of a specific item in a specific slot
- Command settings:
{modification}: Positive value to increase the durability. Negative value to decrease the durability{slot}: The slot number of the item (-1 for the held slot)
{supportUnbreaking}: (true or false) If it supports the unbreaking enchantment or not
- Example:
activators:
  activator0: # Activator ID, you can create as many activator on the activators list
    option: # Here goes an activator that is at least instance of player
    playerCommands:
    - MODIFY_DURABILITY modification:-1 slot:%slot% supportUnbreaking:true
OPEN_CHEST
- Info: It opens a chest or barrel in the selected location
- Command settings:
{world}: World name{x}: X coordinate{y}: Y coordinate{z}: Z coordinate[bypassProtections]: (Optional) (default = false) If it will open the chest anyways even if its protected
- Example:
activators:
  activator0: # Activator ID, you can create as many activator on the activators list
    option: # Here goes an activator that is at least instance of player
    playerCommands:
    - OPENCHEST VanillaWorld 100 100 100
OPEN_ENDERCHEST
- Info: It opens the ender chest for the player that runs the activator
- No command setting
- Example:
activators:
  activator0: # Activator ID, you can create as many activator on the activators list
    option: # Here goes an activator that is at least instance of player
    playerCommands:
    - OPEN_ENDERCHEST
OPEN_WORKBENCH
- Info: It opens a workbench for the player that runs the activator
- No command setting
- Example:
activators:
  activator0: # Activator ID, you can create as many activator on the activators list
    option: # Here goes an activator that is at least instance of player
    playerCommands:
    - OPEN_WORKBENCH
OXYGEN
- Info: It gives oxygen to the target
- Command setting:
{time}: The duration in ticks of oxygen you want to give
- Example:
activators:
  activator0: # Activator ID, you can create as many activator on the activators list
    option: # Here goes an activator that is at least instance of player
    playerCommands:
    - OXYGEN time:200
PROJECTILE_CUSTOMDASH1
- Info: Similar to CUSTOMDASH1 but the xyz will be replaced with the xyz coords of the nearest projectile from you.
- Command settings:
{fallDamage}: Whether you will get fall damage or not (If you forgot to set whether it's true or false, the default will be false. To get fall damage, set this to true)
- Example:
activators:
  activator0: # Activator ID, you can create as many activator on the activators list
    option: # Here goes an activator that is at least instance of player
    playerCommands:
    - PROJECTILE_CUSTOMDASH1 fallDamage:false
REGAIN_FOOD
- Info: Gives you a specific amount of food/saturation
- Command settings:
{amount}: The amount of saturation points you want to gain. Use negative values to reduce hunger points
- Example:
activators:
  activator0: # Activator ID, you can create as many activator on the activators list
    option: # Here goes an activator that is at least instance of player
    playerCommands:
    - REGAIN_FOOD amount:5
REGAIN_MAGIC
- Info: Gives the player specific values of a specific Ecoskills's magic.
- Command settings:
{ecoSkillsMagicID}: The ID of the Ecoskills's magic.{amount}: The amount to get.
- Example:
activators:
  activator0: # Activator ID, you can create as many activator on the activators list
    option: # Here goes an activator that is at least instance of player
    playerCommands:
    - REGAIN_MAGIC ecoSkillsMagicID:mana amount:15
It supports negative values.
REGAIN_SATURATION
- Info: Gives you a specific amount of saturation
- Command settings:
{amount}: The amount of saturation you can to give
- Example:
activators:
  activator0: # Activator ID, you can create as many activator on the activators list
    option: # Here goes an activator that is at least instance of player
    playerCommands:
    - REGAIN_SATURATION amount:10
REMOVE_ENCHANTMENT
- Info: Remove an enchantment from a slot
- Command settings:
{slot}: Slot to remove the enchantment from (-1 for held slot){enchantment}: Enchantment to remove (ALL for every enchantment)
- Example:
activators:
  activator0: # Activator ID, you can create as many activator on the activators list
    option: # Here goes an activator that is at least instance of player
    playerCommands:
    - REMOVE_ENCHANTMENT slot:-1 enchantment:ALL
REMOVE_LORE
- Info: Remove a lore line
- Command settings:
{slot}: Slot to remove the lore from (-1 for held slot){line}: The line that you want to remove
- Example:
activators:
  activator0: # Activator ID, you can create as many activator on the activators list
    option: # Here goes an activator that is at least instance of player
    playerCommands:
    - REMOVE_LORE slot:1 line:5
REPLACE_BLOCK
- Info: Replaces the block the player is looking at into a different one
- Command settings:
{material}: Block ID (Block states are supported)
- Example:
activators:
  activator0: # Activator ID, you can create as many activator on the activators list
    option: # Here goes an activator that is at least instance of player
    playerCommands:
    - REPLACE_BLOCK STONE_BRICKS
    - REPLACE_BLOCK WATER[LEVEL=0]
SEND_BLANK_MESSAGE
- Info: Sends you a blank message
- No command setting
- Example:
activators:
  activator0: # Activator ID, you can create as many activator on the activators list
    option: # Here goes an activator that is at least instance of player
    playerCommands:
    - SEND_BLANK_MESSAGE
SEND_MESSAGE
- Info: Sends you a message
- MiniMessage supported
- Command settings:
{message}: the message you want to send
- Example:
activators:
  activator0: # Activator ID, you can create as many activator on the activators list
    playerCommands:
    - SEND_MESSAGE text:&fThis is a somewhat random text.
    - SEND_MESSAGE text:<yellow>Hello </yellow><blue>World</blue><yellow>!</yellow> # MiniMessage Suported, but dont use MiniMessage + vanilla at the same time
SEND_CENTERED_MESSAGE
- Info: Sends you a message centered in the chat
- MiniMessage supported
- Command settings:
{message}: the message you want to send
- Example:
activators:
  activator0: # Activator ID, you can create as many activator on the activators list
    option: # Here goes an activator that is at least instance of player
    playerCommands:
    - SEND_CENTERED_MESSAGE text:&fThis is a somewhat random text.
    - SEND_CENTERED_MESSAGE text:<yellow>Hello </yellow><blue>World</blue><yellow>!</yellow> # MiniMessage Suported, but dont use MiniMessage + vanilla at the same time
SET_ARMOR_TRIM
- Info: Set the specific armor trim with the specific pattern for the specified slot
- Command settings:
{slot}: The slot to apply the command (slot -1 for main hand){pattern}: The pattern of the trim (if 'null' or 'remove' it will remove the current pattern). TrimPattern list{patternMaterial}: The material of the pattern. TrimMaterial list
- Example:
activators:
  activator0: # Activator ID, you can create as many activator on the activators list
    option: # Here goes an activator that is at least instance of player
    playerCommands:
    - SET_ARMOR_TRIM slot:38 pattern:vex patternMaterial:netherite
    - SET_ARMOR_TRIM slot:38 pattern:null #to clear the armor trim
SET_BLOCK
- Info: Place a block on the block targeted by the player
- Command settings:
{blockface}: You can specify or not a blockFace to force the placement above for example. BlockFaces{material}: Block ID (Block states are supported){bypassProtection}: Whether or not it will place the block even if the player doesnt have the permission
- Example:
activators:
  activator0: # Activator ID, you can create as many activator on the activators list
    option: # Here goes an activator that is at least instance of player
    playerCommands:
    - SET_BLOCK blockface:UP material:OAK_WOOD
    - SET_BLOCK material:FURNACE[LIT=TRUE]
SET_BLOCK_POS
- Info: Set a block in a specific position
- Command settings:
{x}: X-Coordinate{y}: Y-Coordinate{z}: Z-Coordinate{material}: the material of the block[bypassProtection]: (Optional) (default = false), whether or not it bypass region, claim , island protection[replace]: (Optional) (default = true), whether or not it replaces the block if one already exists
- Example:
activators:
  activator0: # Activator ID, you can create as many activator on the activators list
    option: # Here goes an activator that is at least instance of player
    playerCommands:
    - SET_BLOCK_POS x:0 y:0 z:0 material:STONE bypassProtection:false replace:true
SET_EQUIPPABLE_MODEL
- Info: Sets the equippable model data of an item in a specific slot
- Command settings:
{slot}: The slot number of where the target item is{model}: The equipment model name you wish to assign to the item
- Example:
activators:
  activator0: # Activator ID, you can create as many activator on the activators list
    option: # Here goes an activator that is at least instance of player
    playerCommands:
    - SET_EQUIPPABLE_MODEL slot:-1 model:minecraft:diamond
SET_EXECUTABLE_BLOCK
- Info: Setblock but for Executable Blocks. (EXECUTABLE BLOCKS MUST BE INSTALLED)
- Command settings:
{id}: ID of the executable block you are trying to place down{x}: X-Coordinate{y}: Y-Coordinate{z}: Z-Coordinate{world}: Name of the world[replace]: (Optional) (default = true). Whether it will replace the existing block in the said coordinates or not[bypassProtection]: (Optional) (default = false) if you want bypass the protections like worldguard[ownerUUID]: (Optional) (default = no owner) The uuid of the supposed owner of the executable block
- Example:
activators:
  activator0: # Activator ID, you can create as many activator on the activators list
    option: # Here goes an activator that is at least instance of player
    playerCommands:
    - SET_EXECUTABLE_BLOCK id:Mithril_Ore x:%block_x_int% y:%block_y_int% z:%block_z_int% world:%block_world% replace:false bypassProtection:true ownerUUID:%player_uuid%
SET_ITEM_COLOR
- Info: Sets a specific color for the item (item colorables as leather armor / firework star)
- Command settings:
{slot}: The slot where it will be applied. (-1 for mainhand)
{color}: number value of the color. Coloer picker website- Example:
activators:
  activator0: # Activator ID, you can create as many activator on the activators list
    option: # Here goes an activator that is at least instance of player
    playerCommands:
    - SET_ITEM_COLOR slot:1 color:0
SET_ITEM_ATTRIBUTE
- Info: It sets an attribute to an item.
- Command settings:
{slot}: The slot where it will be applied. (-1 for mainhand){attribute}: The attribute you want to add. Attributes{value}: The value for the operation{equipmentSlot}: The slot for the attribute EquipmentSlots
- Example:
activators:
  activator0: # Activator ID, you can create as many activator on the activators list
    option: # Here goes an activator that is at least instance of player
    playerCommands:
    - SET_ITEM_ATTRIBUTE slot:%slot% attribute:GENERIC_ARMOR value:10 equipmentSlot:CHEST
SET_ITEM_COOLDOWN
- Gives the player/target cooldown on an item
- Command settings:
{material or group}: The type of material or the group. More info for group{cooldown}: cooldown in seconds
- Example:
activators:
  activator0: # Activator ID, you can create as many activator on the activators list
    option: # Here goes an activator that is at least instance of player
    playerCommands:
    - SET_ITEM_COOLDOWN material:ENDER_PEARL cooldown:10
activators:
  activator0: # Activator ID, you can create as many activator on the activators list
    option: # Here goes an activator that is at least instance of player
    playerCommands:
    - SET_ITEM_COOLDOWN group:my_cooldown_group cooldown:10
SET_ITEM_CUSTOM_MODEL_DATA
- Info: Sets a specific custom model data to the specific item
- Command settings:
{slot}: The slot where it will be applied. (-1 for mainhand){customModelData}: value of the customModelData
- Example:
activators:
  activator0: # Activator ID, you can create as many activator on the activators list
    option: # Here goes an activator that is at least instance of player
    playerCommands:
    - SET_ITEM_CUSTOM_MODEL_DATA slot:10 customModelData:10
SET_ITEM_LORE
- Info: Sets a line of lore
- Command settings:
{slot}: Slot number (-1 for mainhand)
{line}: If you want to set the lore of the first type 1{text}: The new line text- Example:
activators:
  activator0: # Activator ID, you can create as many activator on the activators list
    option: # Here goes an activator that is at least instance of player
    playerCommands:
    - SET_ITEM_LORE slot:%slot% line:3 text:&6LEGENDARY SWORD
SET_ITEM_MATERIAL
- Replaces the material of the item with a different material while keeping the nbt of the target item
- Command settings:
{slot}: Slot number (-1 for mainhand)
{material}: The material you want the item to become into- Example:
activators:
  activator0: # Activator ID, you can create as many activator on the activators list
    option: # Here goes an activator that is at least instance of player
    playerCommands:
    - SET_ITEM_MATERIAL slot:10 material:DIAMOND_HOE
SET_ITEM_MODEL
- Info: Sets a custom model for your item in a specific slot
- Command settings:
{slot}: The slot where it will be applied. (-1 for mainhand){model}: the model value you want to apply to the target item
- Example:
activators:
  activator0: # Activator ID, you can create as many activator on the activators list
    option: # Here goes an activator that is at least instance of player
    playerCommands:
    - SET_ITEM_MODEL slot:-1 model:minecraft:stone
SET_ITEM_NAME
- Info: Sets a custom name for your item in a specific slot
- Command settings:
{slot}: The slot where it will be applied. (-1 for mainhand){name}: the new name of the item
- Example:
activators:
  activator0: # Activator ID, you can create as many activator on the activators list
    option: # Here goes an activator that is at least instance of player
    playerCommands:
    - SET_ITEM_NAME slot:%slot% name:&eThis is the new name of the item
SET_ITEM_POTIONCOLOR
- Info: Sets a custom color to an item potion color in a specific slot
- Command settings:
{slot}: The slot where it will be applied. (-1 for mainhand){color}: The color you want to apply. For the color, go tohttps://www.tydac.ch/color/and get theMapInfo Colorvalue of the color of your choice.
- Example:
activators:
  activator0: # Activator ID, you can create as many activator on the activators list
    option: # Here goes an activator that is at least instance of player
    playerCommands:
    - SET_ITEM_POTIONCOLOR slot:%slot% color:10944256
SET_ITEM_TOOLTIPSTYLE
- Info: Sets the custom tooltip style of the item in slot.
- Command settings:
{slot}: The slot where it will be applied. (-1 for mainhand){tooltipModel}: (Default value:namespace:id) The tooltip id.
- Example:
activators:
  activator0: # Activator ID, you can create as many activator on the activators list
    option: # Here goes an activator that is at least instance of player
    playerCommands:
    - SET_ITEM_TOOLTIPSTYLE slot:-1 tooltipModel:namespace:id
SET_PLAYER_TIME
- Info: Sets the player's time without affecting the time server-side.
- Command settings:
{time}: The time value. Enter-1to reset the player's time back to relying on server-side time.{relative}: (Default value: false) If not true, it will set the user's POV time to that value literally. But if true, it will take the world's current time and add it with the provided value to set your current POV time.
- Example:
activators:
  activator0: # Activator ID, you can create as many activator on the activators list
    option: # Here goes an activator that is at least instance of player
    playerCommands:
    - SET_PLAYER_TIME time:6000 relative:false
SET_PLAYER_WEATHER
- Info: Sets the player's weather without affecting the time server-side.
- Command settings:
{weather The time value}: Sets the player's weather in their POV- Options:
- RESET : Restores it back to the server-side weather
- DOWNFALL : Raining or snowing depending on biome
- CLEAR : Clear weather, clouds but no rain.
- Options:
- Example:
activators:
  activator0: # Activator ID, you can create as many activator on the activators list
    option: # Here goes an activator that is at least instance of player
    playerCommands:
    - SET_PLAYER_WEATHER weather:CLEAR
SET_TEMP_BLOCK_POS
- Info : Set a temporary block
- Command settings:
{x}: X-Coordinate{y}: Y-Coordinate{z}: Z-Coordinate{world}: Name of the world{material}: Block ID{time}: Time in ticks[bypassProtection]: (Optional) (default = false)Whether to ignore 3rd party intervention or not[whitelistCurrentBlock]: (Optional) (default = can set on every types of block) List of blocks to watch out for- Examples:
- AIR, WATER
- !STONE, !COBBLESTONE
activators:
  activator0: # Activator ID, you can create as many activator on the activators list
    option: # Here goes an activator that is at least instance of player
    playerCommands:
    - SET_TEMP_BLOCK_POS x:%entity_x% y:%entity_y% z:%entity_z% world:%entity_world% material:BEDROCK time:40 bypassProtection:true whitelistCurrentBlock:!AIR,!WATER
It doesn't replace blocks that have extra datas (inventory, rotation, etc)
SPAWN_ENTITY_ON_CURSOR
- Info: Spawn entities on your cursor
- You can specify an EntityType
- Or an entity definition example:
{HasVisualFire:1b,id:"minecraft:bee"}(1.21.+) - Or a MythicMob ID
- Command settings:
{entity}: The entity specification{amount}: The amount of mobs that will spawn in that spot[maxRange]: (Optional) (default = 200) The max range of the spawn
- Example:
activators:
  activator0: # Activator ID, you can create as many activator on the activators list
    option: # Here goes an activator that is at least instance of player
    playerCommands:
    - SPAWN_ENTITY_ON_CURSOR entity:CREEPER amount:1
# With EntitySnapshot
- SPAWN_ENTITY_ON_CURSOR entity:{HasVisualFire:1b,id:"minecraft:bee"} amount:1

# With MythicMob ID
- SPAWN_ENTITY_ON_CURSOR entity:MyCustomBossID amount:1
SUDO
- Info: Forces you to run a command
- Command setting:
{command}: The command to run
- Example:
activators:
  activator0: # Activator ID, you can create as many activator on the activators list
    option: # Here goes an activator that is at least instance of player
    playerCommands:
    - SUDO sit
    - SUDO say hi
SUDO_OP
- Info: Gives the player OP, SUDOs the player and DEOPs it
- Extra Info: During the OP, the player can only run the specified command after the SUDOOP, all other commands are blocked when the player is OP, and if the server crashes, no problem. The player will be DEOPed when the player reconnects.
- Command settings:
{command}: The command to run with OP
- Example:
activators:
  activator0: # Activator ID, you can create as many activator on the activators list
    option: # Here goes an activator that is at least instance of player
    playerCommands:
    - SUDO_OP summon zombie
    - SUDO_OP fly
    - SUDO_OP god
    - SUDO_OP /replacenear 20 tnt
It is not recommended to use this a lot. As it is explained on the top of this page, if want to run vanilla commands use the execute command (Explained on the FAQ How to use vanilla commands).
Only use SUDOOP if there is absolutely no other option — it should be your last resort, not your first choice.
SWAP_HAND
- Info: Swaps the current item with your offhand item
- No command setting
- Example:
activators:
  activator0: # Activator ID, you can create as many activator on the activators list
    option: # Here goes an activator that is at least instance of player
    playerCommands:
    - SWAP_HAND
TRANSFER_ITEM
- Info: Swaps 2 items in the inventory by slot
- Command settings:
{slot of launcher}: Target slot for slot no.1{slot of receiver}: Target slot for slot no.2
[boolean drop]: (Optional) (default = false) Whether slot of launcher gets dropped during the swap or not
XP_BOOST
- Info: Boost the xp gain for a time.
- Command settings:
{multiplier}: XP multiplier value{timeinsecs}: Duration in seconds
- Example:
activators:
  activator0: # Activator ID, you can create as many activator on the activators list
    option: # Here goes an activator that is at least instance of player
    playerCommands:
    - XP_BOOST 2 10
Be careful ! This command can get stacked, so if you run this command multiple times you will get more and more multipliers if the time between them is not enough for the last boost to disappear.\
- XP_BOOST 2 5
- DELAY 1
- XP_BOOST 2 5
This means the XP will be boosted in this order:
- 1 second: x2
- 4 seconds: x4
- 1 second: x2